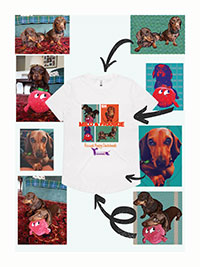
This is a fun and efficient way to transform your photographs into vibrant, eye-catching pieces reminiscent of the iconic pop art style. Photoshop actions automate the process of applying a sequence of edits to your images, saving you time and ensuring consistency across your artwork. Here’s a step-by-step guide to creating pop art using Photoshop actions:
Step 1: Choose Your Image
Select a high-resolution image that will look good in pop art style. Portraits often work best for this type of art due to their expressive potential, but feel free to experiment with different subjects.
Step 2: Find or Create Pop Art Photoshop Actions
Find Pop Art Actions: Search online for pop art Photoshop actions. There are many free and paid options available on sites like Envato Elements, Adobe Exchange, or Behance. I found a great action on Etsy. Download the action file (.atn) you like.
Create Your Own Action: Alternatively, you can create your own pop art action by manually applying adjustments (like posterization, high contrast, and saturation) and then recording these steps as a new action. This offers more control over the final look.
Step 3: Load the Action in Photoshop
Open Photoshop and go to the Actions panel. If it’s not visible, you can open it by going to Window > Actions.
Click on the menu icon in the top right corner of the Actions panel and select Load Actions. Navigate to where you saved your downloaded or created action file and load it.
Step 4: Apply the Action
Open the image you want to transform into pop art.
In the Actions panel, select the pop art action you wish to apply.
Press the play button at the bottom of the panel to apply the action to your image.
Step 5: Fine-Tune Your Image
After applying the action, you might want to make some adjustments to perfect the image. You can tweak the layers created by the action for better contrast, saturation, or to adjust specific colors.
If the action supports it, play around with different settings or layer visibility to achieve the desired effect.
Step 6: Add Final Touches
Pop art often features bold colors and outlines. Consider adding a black outline around your subject or using the Pen tool to create additional elements that enhance the pop art feel.
Add text elements or comic-style speech bubbles for a more authentic pop art look.
Step 7: Save and Share Your Artwork
Once you’re satisfied with your pop art creation, save your image. It’s a good idea to save a Photoshop (.psd) version with layers intact, in case you want to make further edits later.
Save a separate version in a format suitable for sharing or printing, such as JPEG or PNG.
Tips for Success
Experiment with different images and actions to see what works best. The more you practice, the better you’ll become at choosing images and actions that yield great results.
Remember, the key to pop art is bold, contrasting colors and a fun, irreverent approach to subject matter. Don’t be afraid to experiment with unconventional color schemes or subjects.
Consider the background of your image. Pop art often features solid or minimally detailed backgrounds to make the subject stand out more.
Creating pop art with Photoshop actions is a great way to explore your creativity and produce stunning artwork with a modern twist on a classic style.

